Tranferring Data
There are several recommended approaches for transferring data to and from the UConn Health HPC file system.
Each is most suitable for different situations. We explain the usage of each tool below.
Secure Copy
Secure copy is ideal for transferring small amounts of data. A secure copy can be performed with the scp command which is available in the Windows PowerShell or MacOS / Linux Terminal.
This command should only be used to transfer data to and from a transfer node which is a dedicated node for transferring data. The transfer nodes have accesses to the same file systems as the login and compute nodes. We recommend using the transfer.hpc.cam.uchc.edu URL. Transferring data through this URL requires that you have setup SSH keys and that you be connected to the UConnHealth-SECURE WiFi or the CAM VPN.
Transferring a File To the UConn Health HPC File System
In order to transfer data from a local computer to the UConn Health HPC file system with scp:
scp <local_file_path> <user>@transfer.hpc.cam.uchc.edu:<remote_path>Where <local_file_path> is the path to the file on your local computer, <user> is your CAM username, and <remote_path> is the path on the UConn Health HPC file system where you want to copy the file. <remote_path> can be excluded if you want to copy the file to your home directory.
Transferring a File From the UConn Health HPC File System
To transfer data from the UConn Health HPC file system to a local computer with scp:
scp <user>@transfer.hpc.cam.uchc.edu:<remote_file_path> <local_file_path>Where <user is your CAM username, <remote_file_path> is the path to the file on the UConn Health HPC file system, and <local_file_path> is the path on your local computer where you want to copy the file. Simply use a . for <local_file_path> to copy the file to your current working directory.
Transferring a Directory
In order to transfer a directory, you will need to use the -r flag to recursively copy all files and subdirectories. For example, to copy a directory from your local computer to the UConn Health HPC file system:
scp -r <local_directory_path> <user>@transfer.hpc.cam.uchc.edu:<remote_path>Wildcards
Secure copy also supports the use of wildcards such as * for the remote path as long as wildcard characters are escaped with a \ or the url + path are enclosed in quotes. For example, to copy all .txt files from your UConn Health HPC file system home directory to your local computer:
scp <user>@transfer.hpc.cam.uchc.edu:\*.txt <local_directory_path>or
scp "<user>@transfer.hpc.cam.uchc.edu:*.txt" <local_directory_path>Alternative Transfer Host
There is an additional host that can be used to transfer data without an SSH key. This host requires your CAM password for authentication if you have not setup an SSH key.
The URL for this host is transfer.cam.uchc.edu.
Globus
Globus is well suited for large file transfers, sharing files, and for transferring between institutions such as when you need to share files with a collaborator.
Getting Started
Globus has excellent documentation. We recommend starting with this tutorial which contains almost everything you need to know to use Globus in addition to making note of the specifics below.
Accessing the UCHC Globus Server
Organizational Login
When first logging in to the Globus App, you will be prompted to select your organization. You should select the University of Connecticut. If you are not already logged in, you will be prompted to enter your UConn NetID and password.
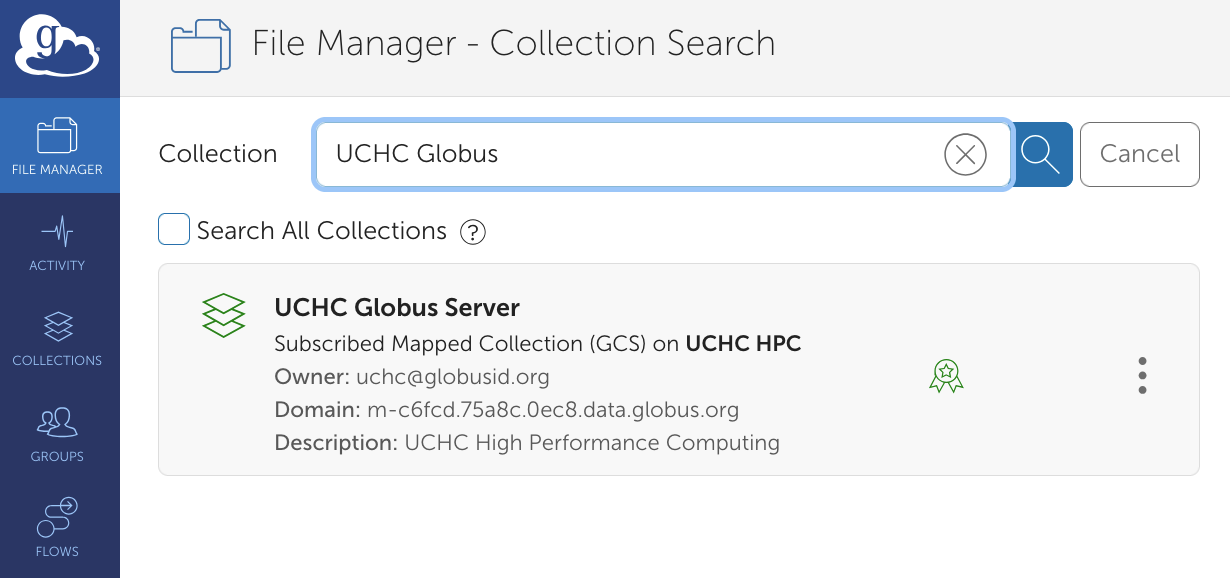
UCHC Globus Server Collection
To access the UConn Health HPC file system, search for and select, the UCHC Globus Server in the collection text field. Upon selecting the UCHC Globus Server, you will be prompted to enter your CAM username and password.
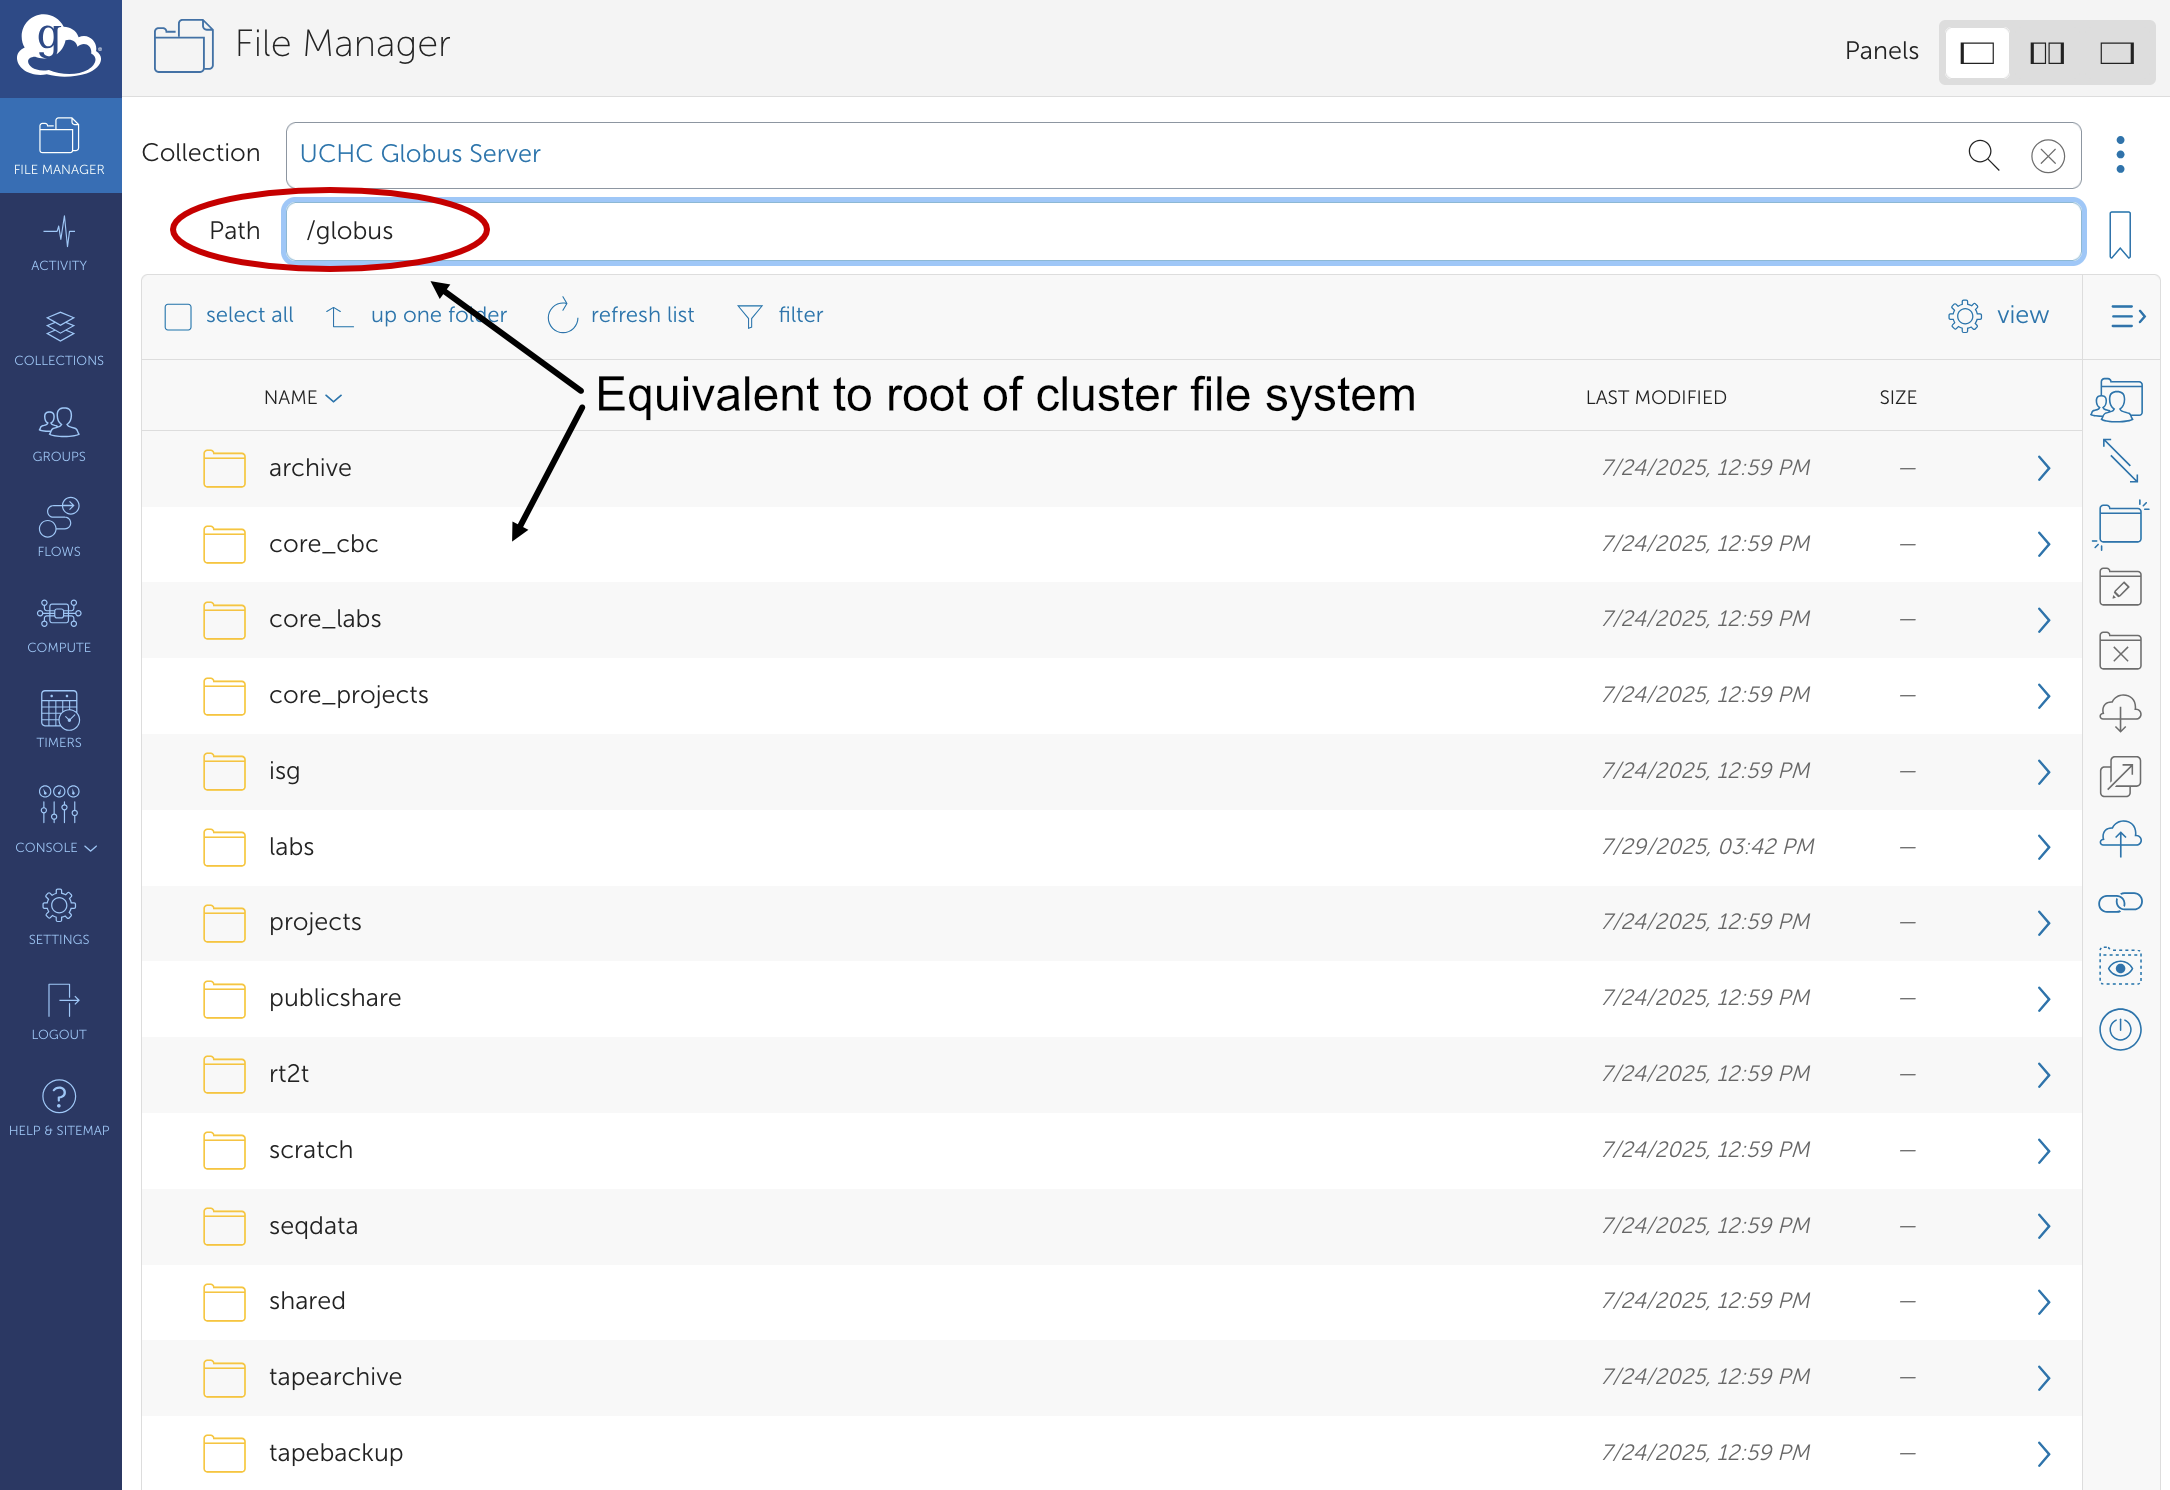
File Paths
Navigation to your home directory mirrors the cluster file system. You can access your home directory by entering /home/FCAM/<user> in the path text field.
Navigation to other directories has one minor but unintuitive difference. The root of the cluster file system is /globus instead of /. So, for example, to access the labs directory you would enter /globus/labs in the Path text field.
Transferring Files Locally
In order to transfer files to a local computer, you will need to install the Globus Connect Personal application.
Sharing Files
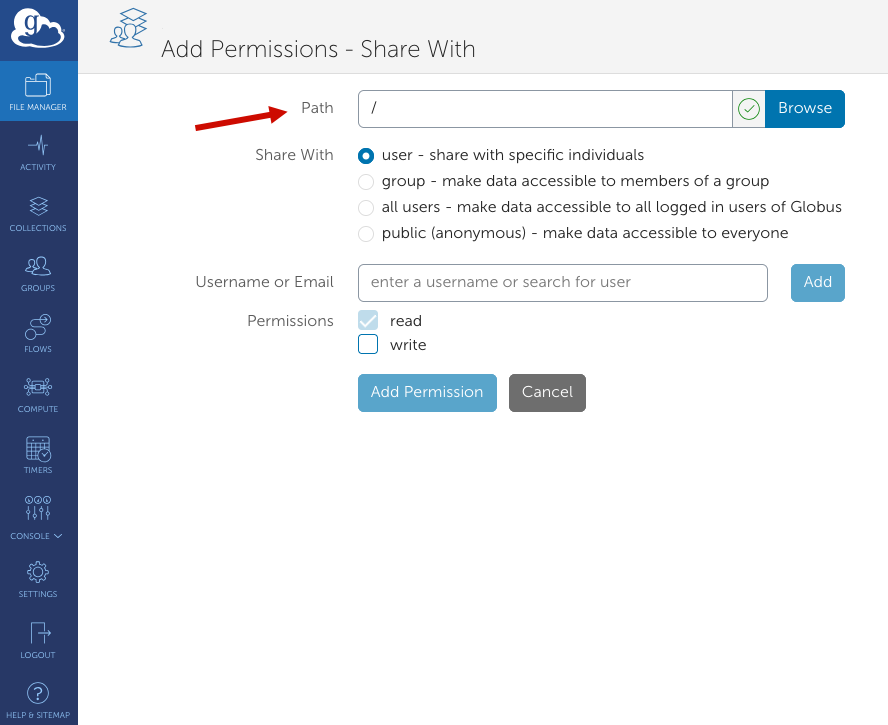
For a guide on sharing files with Globus, see this tutorial.
When adding permissions in step 6, you generally will not need to modify the Path text field. The / in this case refers to the root of the collection and not the cluster file system.
Mounting SMB Share
SMB is a network file sharing protocol that allows applications such as your file manager to read and write to files on a remote server as if they were local files. IGV or your browser are other examples of applications which you may want to use to read files directly on the UConn Health HPC file system.
To connect to the UConn Health HPC file system using SMB and mount one of the directories, you will need to determine the URL or IP address and path of the directory you want to mount. Below is a list of the most commonly used directories and their URLs or IPs.
| Directory | Windows | MacOS / Linux |
|---|---|---|
| /home/FCAM/home | \\cfs09.cam.uchc.edu\home\FCAM\<user> |
smb://cfs09.cam.uchc.edu/home/FCAM/<user> |
| /labs | \\cfs15.cam.uchc.edu\labs\<path> |
smb://cfs15.cam.uchc.edu/labs/<path> |
| /projects | \\155.37.251.38\projects\<path> |
smb://155.37.251.38/projects/<path> |
| /departments | \\155.37.250.151\departments\<path> |
smb://155.37.250.151/departments/<path> |
| /scratch | \\cfs08.cam.uchc.edu\ifs\scratch\<path> |
smb://cfs08.cam.uchc.edu/ifs/scratch/<path> |
| /sandbox | \\155.37.248.191\sandbox\<path> |
smb://155.37.248.191/sandbox/<path> |
Replace <user with your CAM usern<path> with the specific subdirectory path that you want to access.
The df -h command can be used to list all of file systems and their URLs.
Connecting
To connect to the UConn Health HPC file system using SMB, you will need to follow the instructions below for your specific operating system.
- Connect to the CAM VPN if not on the UCHC secure WiFi network.
- Open File Explorer from the taskbar or the Start menu.
- Select This PC from the left pane. Then, on the File Explorer ribbon, select More > Map network drive.
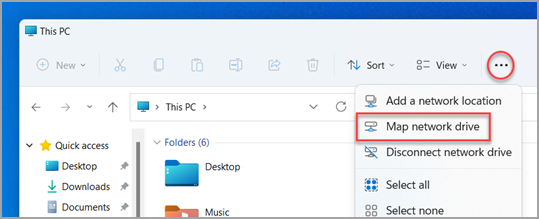
- In the Drive list, select a drive letter. (Any available letter will do.)
- In the Folder box, enter the SMB server URL and path you want to mount from the table above. To connect every time you sign in to your PC, select Reconnect at sign-in.
- Select Finish.
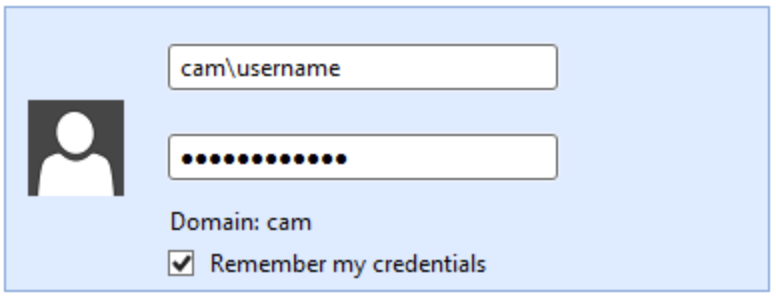
- When prompted for a username and password, enter your username as CAM<user> and enter your CAM password.
- Connect to the CAM VPN if not on the UCHC secure WiFi network.
- Open File Explorer from the taskbar or the Start menu
- Select This PC from the left pane. Then, on the Computer tab, select Map network drive.
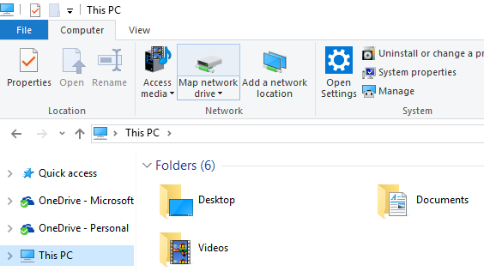
- In the Drive list, select a drive letter. (Any available letter will do.)
- In the Folder box, enter the SMB server URL and path you want to mount from the table above. To connect every time you sign in to your PC, select Reconnect at sign-in.
- Select Finish.
- When prompted for a username and password, enter your username as CAM<user> and enter your CAM password.
- Connect to the CAM VPN if not on the UCHC secure WiFi network.
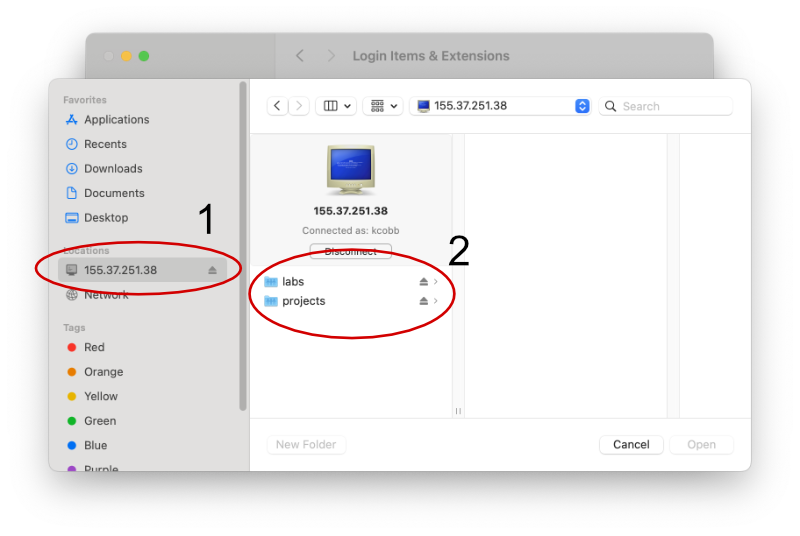
- Open Finder and select
Go:Connect to Serverfrom the top menu. - Enter the address of the SMB server URL and path you want to connect to.
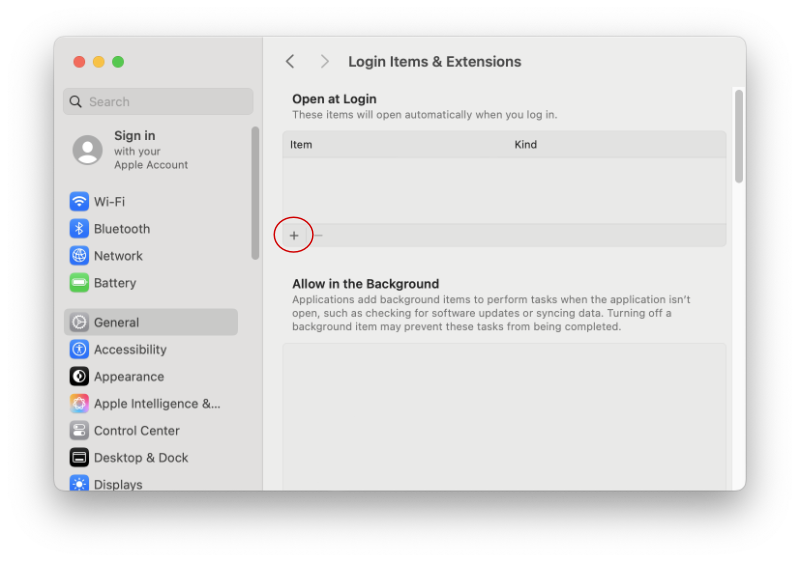
- In order to automatically mount the SMB share, navigate to
System Settings>General>Login Items & Extensions. - Under the
Open at Loginsection, click the+button and
- Select the mounted SMB share on the sidebar and then the directory or directories in your finder window.
- When prompted for a username and password, enter your CAM username and password.